

Kayak anglers are riding the waves of progress by fishing bigger water and pushing the limits of what our yaks can do. We are kitting out our rigs and using more advanced techniques every day. It is not uncommon to see kayaks using the types of electronics that we thought we would only ever see on powerboats. While kayak and accessory manufacturers are making huge strides toward the easy integration of electronics on yaks, the successful installation of these tools still requires a feat of ingenuity by the angler themselves. While the number of anglers installing these devices is growing, there are still only a few examples of prior work to use for guidance. Lucky for me I happen to know several very proficient kayak anglers who have installed Lowrance Structure Scan compatible fish finders on their kayaks so I knew some of the headaches they had to work through, but I only found one example of someone in a Slayer Propel with a similar device. I knew that as I prepared to install I would have to start with some fairly intensive planning, so I took what I could find and began formulating a plan that I liked. My main concerns were:
- Head unit placement/mounting hardware
- Transducer placement/mounting hardware
- Lowrance GPS Point1 Antenna Location
- Battery Placement and Specifications
- Deck Fittings for thru hull wiring
- Wiring Schematics/integration with lighting
While companies like Railblaza have come up with some elegant solutions to many of the challenges that electronics installation on a kayak present, there were still certain areas that required some creative engineering.

Parts List
1 - Native Watercraft Slayer Propel 13
1 - Lowrance HDS Gen2 Touch Structure Scan Bundle
1 - Lowrance Point1 GPS Antenna
1 - Lowrance NMEA 2000 Networking Kit
1 - Thru hull wire cap
1 - 30+ Amp Hour 12 Volt Battery
2 - Two Wire quick disconnects (You can get just one and cit it in half but it doesn't leave much wire to play with)
Head Unit Mount
2 - Railblaza adjustable extender w/o miniports
1 - Stick of 2-inch aluminum
1 - Starport HD TracMount Kit
1 - Scanstrut DS40P
3 - Feet of 25mm woven cable sleeving, or fishing rod sleeve
1 - Heat Shrink large enough to fit over all wires at head unit and cable sleeving.
Transducer Mounts
2 - Raillaza Kayak Transducer Mount
2 - Railblaza Miniport Tracmount
2 - Railblaza Adjustable Extenders
1 - Railblaza Extender
1 - LSS Transdcuer Bracket
1 - Railblaza Adaptor
1 - Scanstrut DS30P
1 - Heat Shrink (Large enough to fit over rear carry handle and two transducer wires)
1 - Lizard Skin Tape
Planning
There were certain aspects of this particular install that I hadn't really seen in practice, so I knew planning was going to be key. I spent days trying to find the right way to do things. I had removed my old fishfinder, so some holes were already drilled in the boat. The hole at the head unit would need to be widened. I would need to find a stronger mounting solution for the larger head unit. The HDS series of fish finders uses additional wires so the through hull fitting I had for my old unit wouldn't work. The old fish finder had one transducer that I scupper mounted. The new one had two transducers that needed to be mounted within 12 inches of each other; I didn't want to scupper mount them because they were so large, and because I didn't want to introduce any possible sources of interference to the side-scan signal, so relocating the transducers was in order. That also meant two transducer wires, each larger than my previous install, so I had to upgrade the size of that through hull fitting as well. I was adding the Point1 GPS antenna, which would tell my fish finder's GPS which way the boat was pointing, so I had to identify a mounting location for that as close to the transducers as possible. My old battery wasn't going to put out enough power, so a new, higher powered battery was needed. Finally, I had to rethink all of the internal wiring in the hull of the boat. Luckily for me I had some great kayak anglers, DIY engineers, and friends on the Railblaza staff that were of immense help throughout the process. I was able to bounce ideas off of everyone, and then go online to places like Railblaza.com to find products that met the challenges of the install. Most of the parts were pretty readily available online or in local stores, with the exception of the Scanstrut fittings (I had to purchase those from ebay). At the end of the day I was confident that most of what I was doing would work great, but I knew that certain things were going to require some on-the-water testing once I completed the install; for example, the transducer placement on the stern of the boat.

Installation
 |
The head unit with Railblaza
Adjustable Extenders andScanstrut DS40P in place with cable sleeve installation. |
I made a custom aluminum bracket to bolt to the bottom of the HDS9 mounting bracket because the stock HDS9 bracket had a hole cutout in the center and I wanted to mount a Railblaza adjustable extender to the HDS9 bracket directly. I mounted a Railblaza Starport HD with Trac Kit to the stock Native rails. From there I removed the miniports from two Railblaza Adjustable Extenders and bolted them directly together. I did this to keep the mount more compact as I felt it would be stronger this way. Recall that I had my previous Elite 5 DSI mounted here and as such had a 1-inch hole drilled out for the transducer/power wire. This hole wasn't going to be big enough for the HDS9 wires so I opted to widen the hole to about an inch and 7/32 using a step drill bit. Using a Scanstrut Large Deck Seal I drilled out one of the rubber inserts to fit my wires with a bit of room to spare. The rubber was thick enough that using a step bit from both sides left a bit of a collar on the inside of the rubber plug. I used a dremel to even everything out. The bit of extra room around the wire is to allow for the woven cable sleeve to run through the hole as well. This probably isn't totally waterproof, but given its location probably doesn't need to be and it still looks clean.
The Scanstrut deck seals don't require inside access to the hull so they are very easy to mount. I used a piece of small steel cable as a wire fish to get the cables to and through the hole. For a finishing touch I sleeved the cables and heat shrunk both ends of the sleeve. A note on feeding wires: both transducer wires have to feed from the transducer locations to the head unit. So in this case both wires had to feed inside the hull at the back of the boat and then inside the hull until they come out at the head unit. These wires were the first to be fed through because you had to feed them through the inside of the hull out, which can be difficult. Then the power wire and NMEA 2000 wire can be fed from the head unit into the hull.
The Scanstrut deck seals don't require inside access to the hull so they are very easy to mount. I used a piece of small steel cable as a wire fish to get the cables to and through the hole. For a finishing touch I sleeved the cables and heat shrunk both ends of the sleeve. A note on feeding wires: both transducer wires have to feed from the transducer locations to the head unit. So in this case both wires had to feed inside the hull at the back of the boat and then inside the hull until they come out at the head unit. These wires were the first to be fed through because you had to feed them through the inside of the hull out, which can be difficult. Then the power wire and NMEA 2000 wire can be fed from the head unit into the hull.
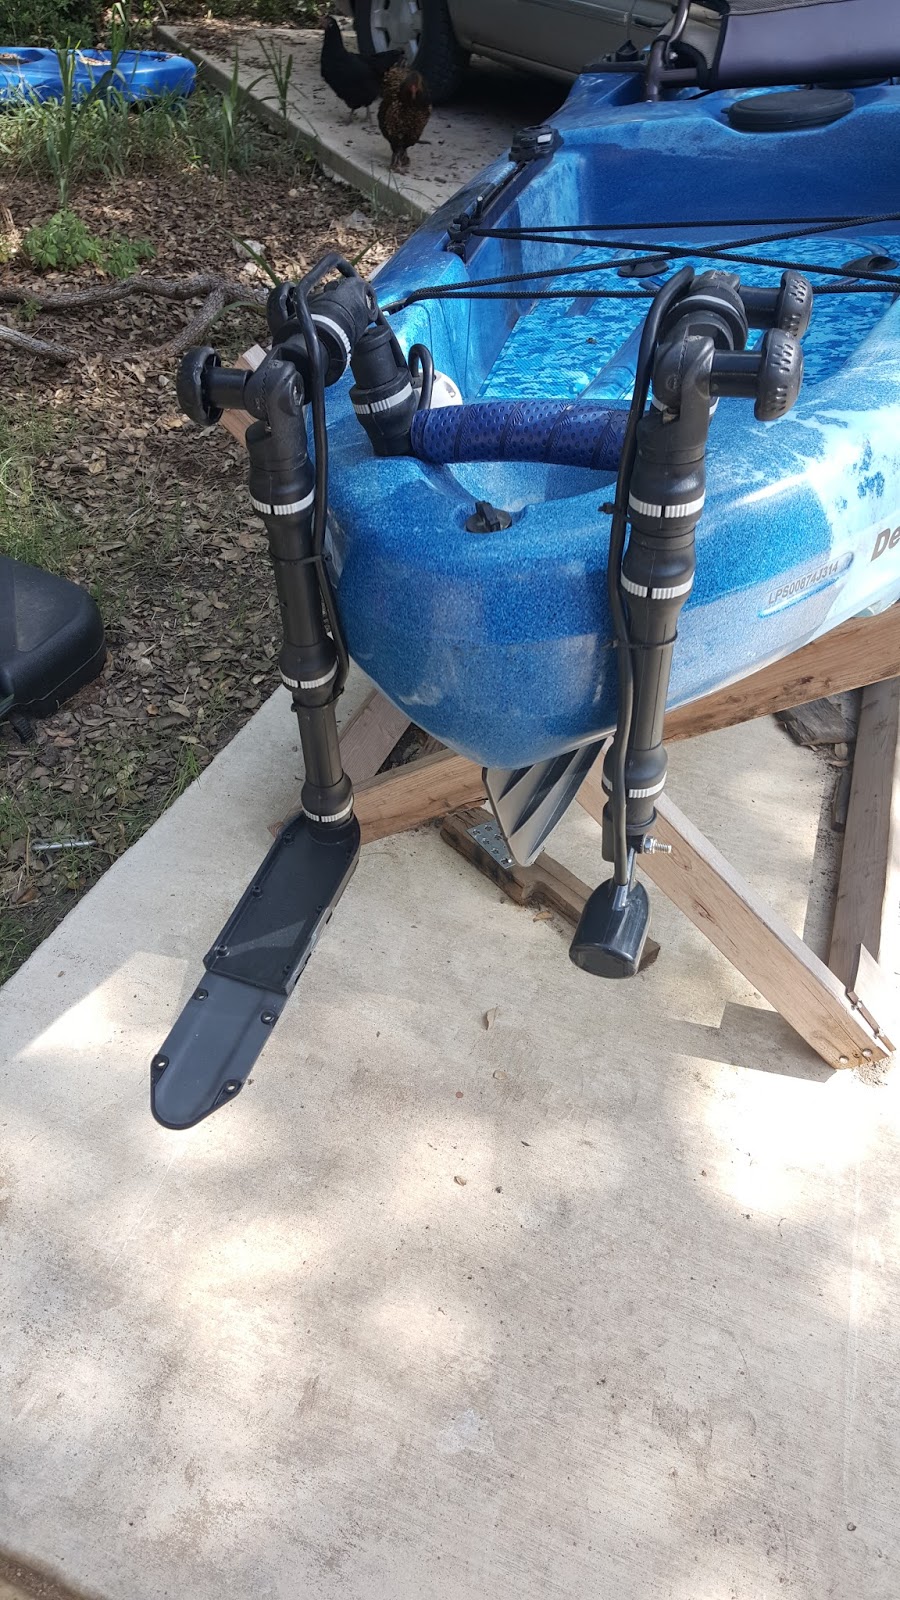 |
| LSS and Sonar transducers mounted using 2 Railbalza transducer arms. |
I thought mounting the transducers was was going to be one of the more difficult parts of the job. However with a little bit of research I came up with a fantastic option. I took two Railblaza MiniPort TracMounts and paired them with some inch and a half 1/4 20 screws and screwed them into existing holes for the rear carry handle. To do this I had to remove the small plastic disk on the TracMount and dremel a small area out to allow for a good fit over the rear carry handle. Form there I used two Railblaza adjustable StarPort Extenders to make a 90 degree turn and then connected Railblaza Transducer Mounts. The transducer mounts worked perfectly out of the box for the sonar transducer. However for the LSS-2 transducer I needed to do some custom work. You could easily make a bracket for the LSS-2 transducer with starboard or similar material that could integrate into the Railblaza system. However I already had bracket that I was easily able to incorporate via a Railblaza adaptor. I also added a Railblaza extender to the LSS transducer arm and an additional mini port to the Sonar arm to extend these arms to my desired depth. These arms are super heavy duty and adjustable while still maintaining a acceptable level of rigidity. I zip-tied the transducer wires to the transducer arms and then ran them through some large diameter heat shrink before sending them into a Scanstrut DS30P fitting on the top deck. I drilled the hole as big as I could while still being able to use the fitting. In this case I only had two large wires so I used the medium deck seal fitting. Again I modified the rubber plug, but to fit the two wires in this case instead of just the one like before. This solution probably needs to be more waterproof, so I drilled to holes in the rubber plug the exact diameter of the wires. I shrunk the heat shrink once everything was in place and wrapped the whole thing in Lizard Skin baseball bat tape to make for a comfortable non slip grip when carrying the boat. It also looks very clean.
 |
| Point1 Antenna mounted behind the seat. |
Point1 Antenna Install
This part was a breeze. I picked a spot behind the seat that was nice and flat, and it was pretty close to the transducers. My understanding is that the Point1 should be close to the transducers because the distance between the two is essentially how far off your waypoints will be when you mark them.
The install itself went very smoothly. I drilled a ¾ inch hole for the wire, set the puck down on the hull with the wire in the hole and then made sure the arrow on top of the transducer was pointing forward and then marked the two screw holes. I drilled those holes slightly smaller than the screws themselves to make for a more water tight seal, but the antenna does have a rubber gasket that fits underneath it so I doubt water will ever be an issue here. The antenna only comes with a couple of screws and I wanted to secure them from the other side of the hull. I used a couple of nuts with nylon inserts that I had laying around that happened to fit perfectly. I backed the screws with those, and viola! Antenna complete. The whole process took less than 10 minutes.
The install itself went very smoothly. I drilled a ¾ inch hole for the wire, set the puck down on the hull with the wire in the hole and then made sure the arrow on top of the transducer was pointing forward and then marked the two screw holes. I drilled those holes slightly smaller than the screws themselves to make for a more water tight seal, but the antenna does have a rubber gasket that fits underneath it so I doubt water will ever be an issue here. The antenna only comes with a couple of screws and I wanted to secure them from the other side of the hull. I used a couple of nuts with nylon inserts that I had laying around that happened to fit perfectly. I backed the screws with those, and viola! Antenna complete. The whole process took less than 10 minutes.
 |
| Here you can see the wiring harness that Dez Davis from SuperNova Fishing Lights came up with. There are 3 waterproof fuse boots, onefor the HDS9, one for the NMEA 2000 backbone, and one for the SuperNova lights int he cockpit and on the bow. |
I opted not to do the in-hull wiring and battery on my own. Why would I, with SuperNova's Dez Davis in my back yard?! I go to the mad scientist himself for some excellent wiring, and maybe some ideas that I hadn't thought of. I got both. I have seen some of his completed work, not just on my boat, and it doesn't get much cleaner. I wanted the wiring for the SuperNova lights that I have installed in the cockpit and bow incorporated into the wiring for the fish finder, so I couldn't think of a better person to help with this.
We started by getting all of the wires to front hatch. We ran the Point1 antenna wire to the front hatch by adding the short extension that came with the Point1. We attached it to the NMEA backbone, and then attached the backbone to the inside of the hull using a button zip-tie that was screwed into one of the screws used to bolt the tracking in place on the Slayer Propel 13. From there I attached the NMEA backbone to the fish finder with one of the NMEA extension wires. I added the NMEA 2000 power wire to the backbone, and then Dez took over. He wired all of the power together for the HDS 9, and the SuperNova lights. He attached that to a single power wire that ran into the front tank well using a thru hull wire cap. That cable was tipped with a quick disconnect fitting. On the battery another quick disconnect fitting was used so that the battery could be easily connected and disconnected for transport and charging. He also resealed the SuperNova lights on the bow to stop some leakage I was having from my DIY install previously, but that’s a topic for another post. Once Dez worked his magic, all of the wiring looked very clean and professional, and more importantly than that – it worked.
Photo Walkthrough
Below is a photo walkthrough of the install.
|
The head unit with Scanstrut DS40P in place with cable sleeve
installation. |
 |
| Custom mounting bracket fabricated from 2-inch aluminum stock. |
 |
| HDS 9 with connectors in place. |
 |
| View of the Railblaza Adjustable Extender connected directly to the custom aluminum mounting bracket. |
 |
| View of the transducer arm miniports bolted into the rear handle of the Native Watercraft Slayer. |
|
| Railblaza Transducer Arms in the deployed position |
 |
| Railblaza Transducer Arms in the stowed position for travel |
 |
| The location of the Point1 GPS antenna. You can't see it here but there is a small arrow on the top of the puck that points forward. A small hole was drilled underneath the puck to allow the wire to pass through the hull. Without this antenna the HDS9's charts will base the orientation of your boat off of movement which isn't always accurate and can cause your charts to flip around which can be an annoyance. |
 |
| 33 Amp Hour AGM battery. You can see the quick disconnect harness that Dez Davis of SuperNova lighting rigged up. |
 |
| The NMEA 2000 start kit pictured here is used to network the Lowrance Point1 Antenna to the HDS9 head unit. The kit consists of a couple of T connectors, a long and short NEMA cable, some caps for the T connectors, and a fused power wire. The Point1 antenna comes with an additional T all of which need to be connected and wired together to get the Point1 signal from the antenna to the head unit and also to power the NMEA 2000 backbone. |
 |
To secure the NMEA 2000 backbone to the boat so that it was not just laying on the bottom of the inside of the hull we used a
button zip tie that allows you to attach the zip tie to a screw. In this case I removed the screw pictured above and replaced it
with a screw slightly longer so that I could place the zip tie on the underside of the hull. I also added a washer to make the
screw tighten down a bit better. Then I attached the NMEA 2000 backbone to the zip tie.
|
 |
| You can see here a screen capture from the HDS9 from underneath a bridge on a local fishery. |
No comments:
Post a Comment